
From clay 3d render to a real action short: a 3D-to-AI pipeline with total control
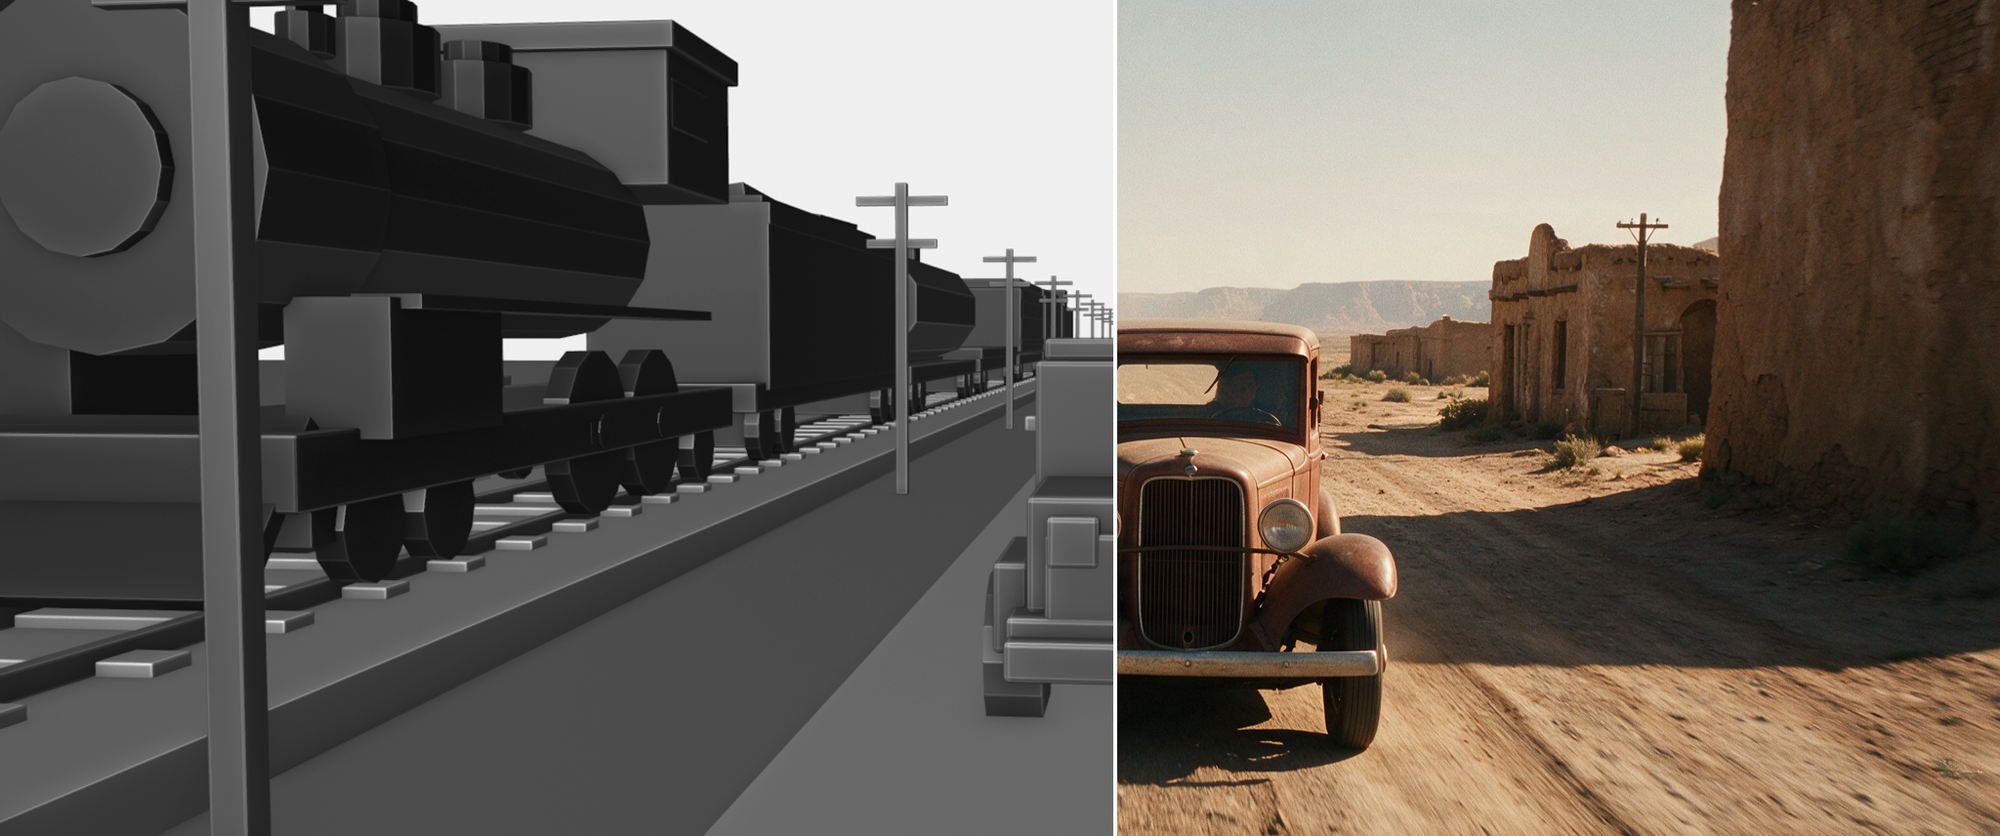
We built a short action film — a 1930s pickup racing a steam freight train through a desert town, and jumping over it — where everything is exactly what was designed upstream: the action, the animation, the camera placement, the timing, the cuts. This post explains the full pipeline, honestly: what worked, what failed, and how much iteration it actually took — and it doubles as the release notes for the new open-source 3DREAL Strong v2 adapter that renders the final pixels.
Update — 3DREAL Strong v2 is out and open source. The LoRA that powers the final pixels of this film now has a new Strong v2 adapter: multi-scene coherence across cuts, synced audio generation, much better talking characters, and sharper output overall. Weights (Light, Strong, Strong v2) are on Hugging Face, and the hosted render-to-real endpoint already runs it.
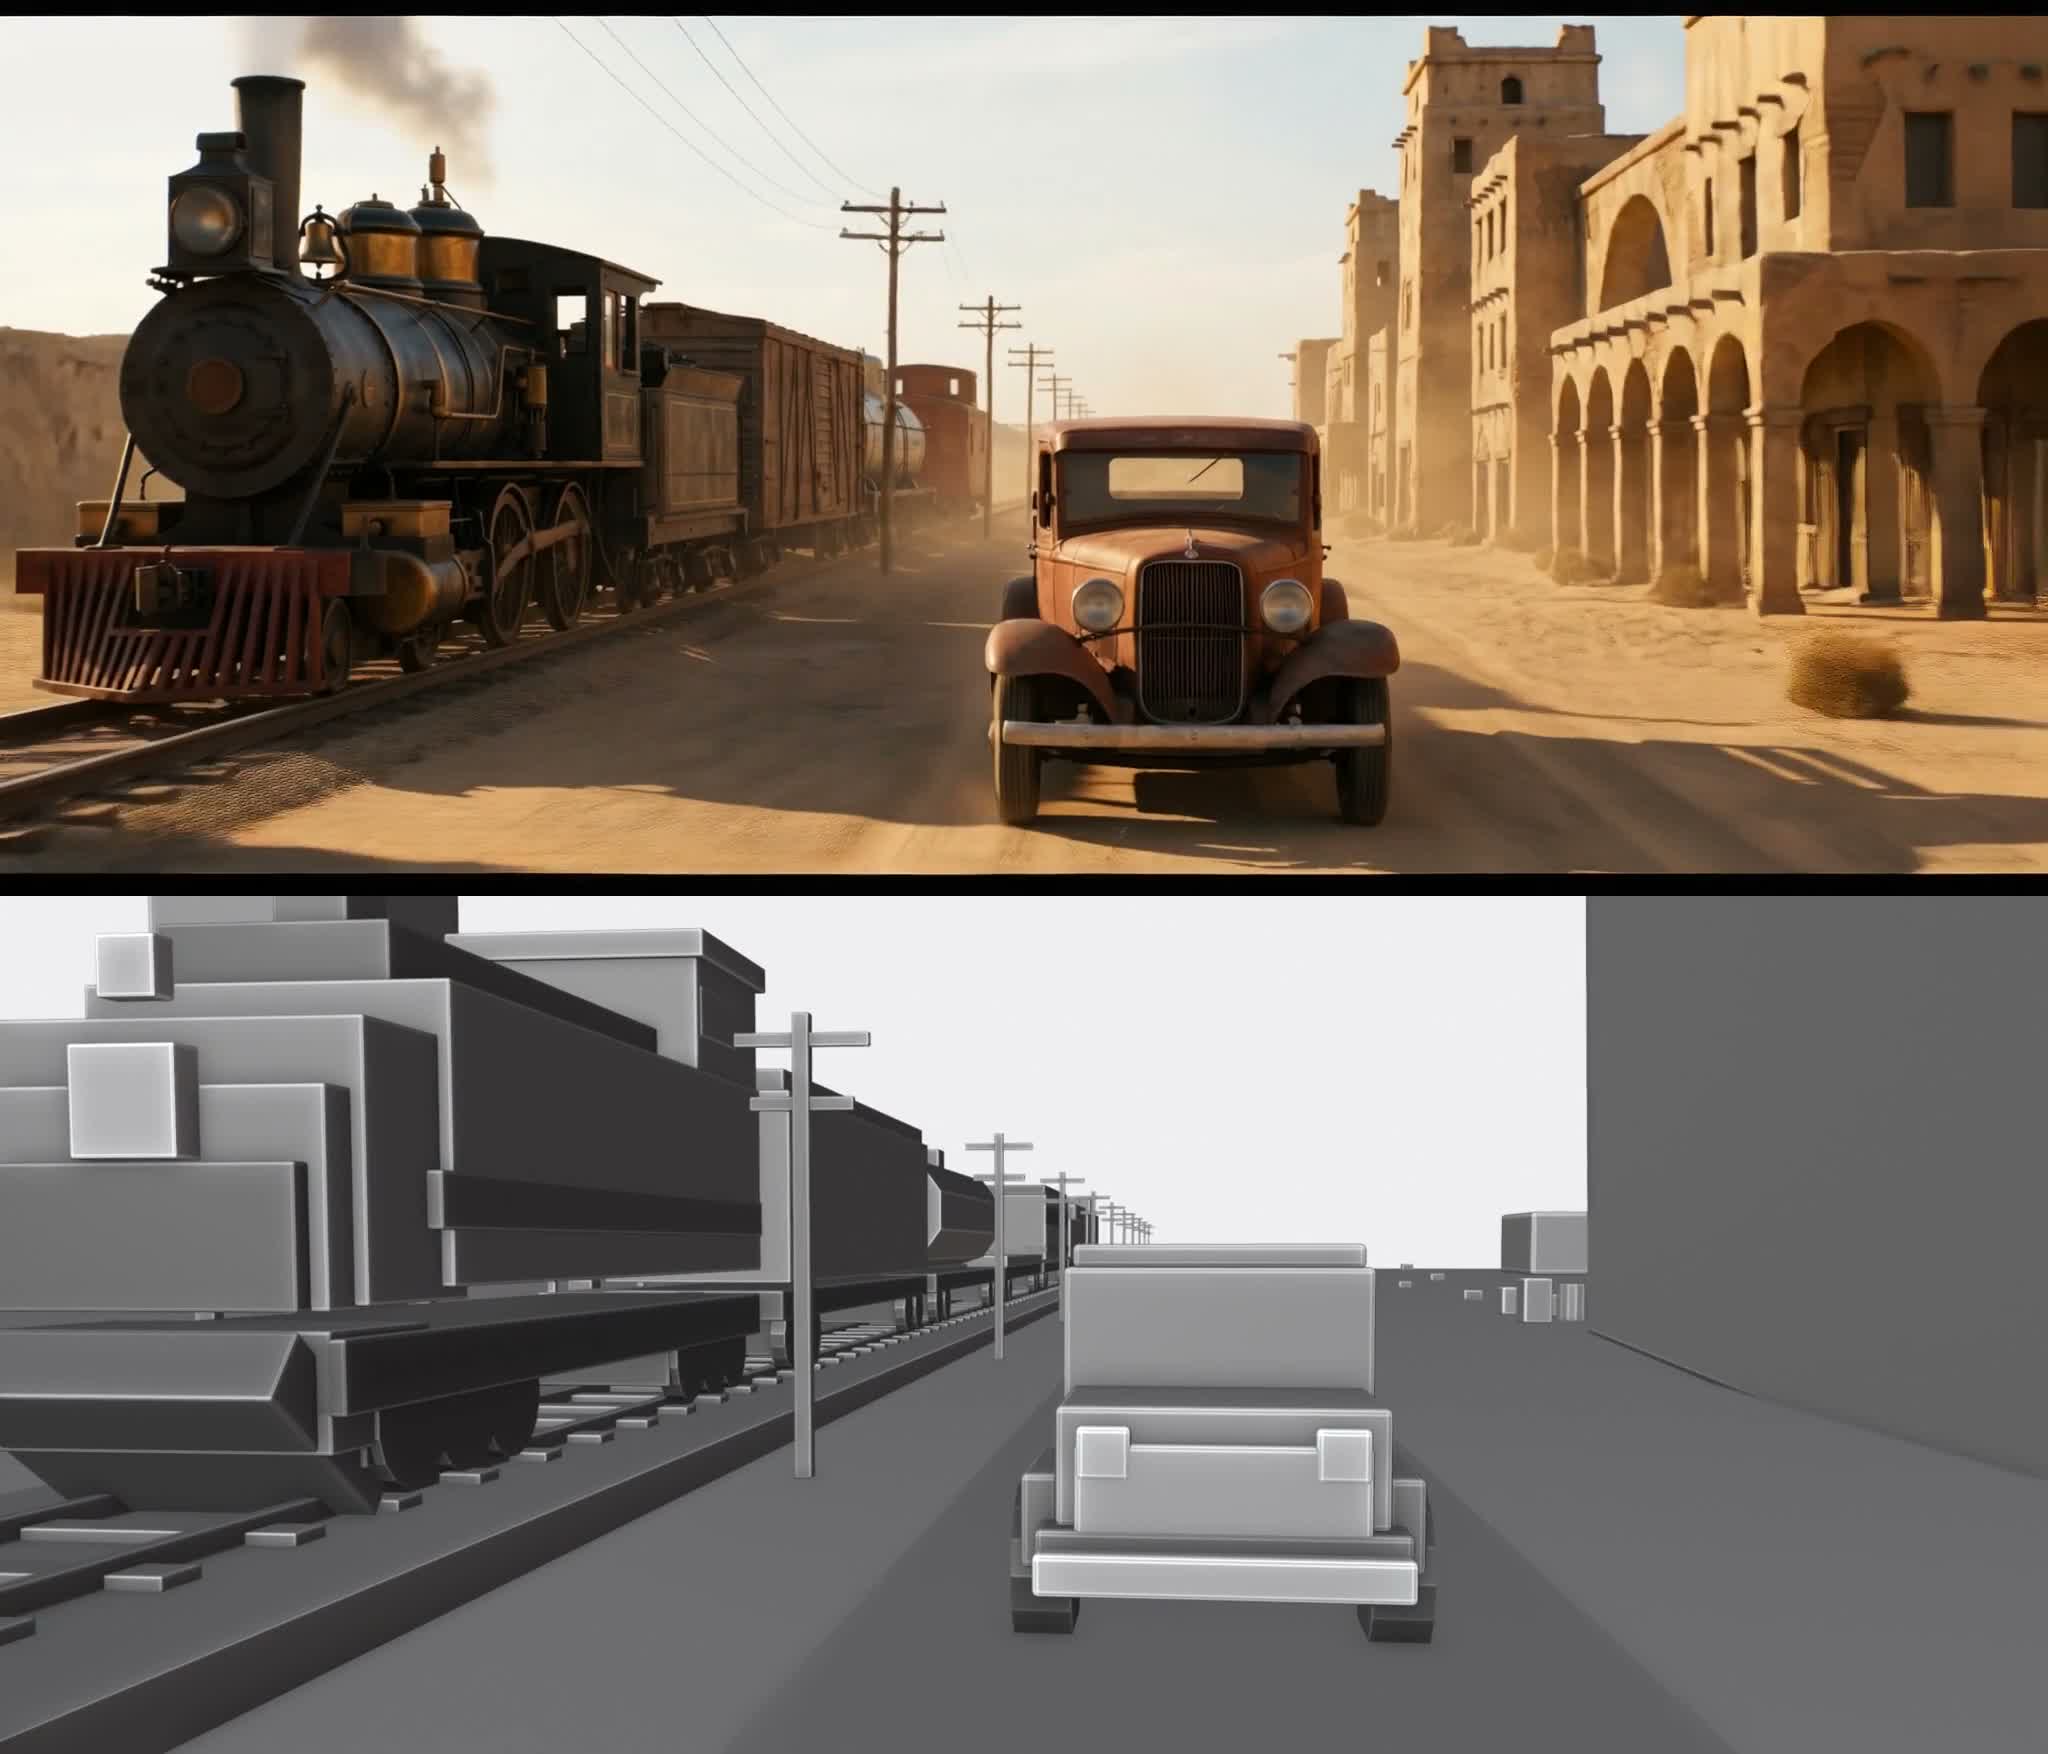
10 seconds, 12 shots, fast cuts — the 3D blockout below each shot, in black & white. Sound on.

Why this pipeline exists
The most recent video models are genuinely impressive. Image-to-video gets you beautiful motion from a single frame — but you can't direct it precisely. Reference-to-video models go further and are getting very good — but they remain expensive, and even the best of them don't give you perfect control: the exact camera path, the exact cut point, the exact trajectory of a truck flying over a train.
This project is not an argument against those models. It's an answer to one specific need: total control — not just of the camera, but of the action itself: what moves, where, when, and how it's framed and cut. With today's tools, most of them open.
The idea is to split the job:
- A 3D blockout owns the geometry — cameras, motion, timing, cuts. Grey boxes, real physics, zero detail. (Blender, driven entirely by the AI through the Blender MCP — no hand modeling.)
- Image models own the look — a set of validated reference images plus one "keyframe" per shot.
render-to-realowns the final pixels — powered by the 3DREAL LoRA for LTX 2.3, which we built and open-sourced on Hugging Face (now including the new Strong v2 adapter): an in-context LoRA whose specialty is turning a grey 3D blockout into photoreal footage while keeping the exact composition, camera move and layout of the input. Hosted endpoint:fal-ai/ltx-2.3-quality/render-to-real.
And one honest disclaimer up front: this is not a one-prompt magic trick. The pipeline runs on three prompts — one per phase — with a human validation step between each. That separation is deliberate: you check the 3D before generating images, you check the images before generating videos. Every phase involved iteration; first results were often wrong, and that's part of the method, not a failure of it.
The 3DREAL LoRA on Hugging Face — Light, Strong and the new Strong v2 adapters.
Step 0 — Think about the recreation while you create
You're still making a real short film — the goal is a finished, watchable 3D-designed action short, not a tech demo. But during creation, you have to think a little differently, because everything you block out will later be recreated by AI:
- The first frame of every shot must clearly show every key element. The video model is driven by each shot's first-frame image. If the car only enters at second 2, the keyframe never contains a car, and the model has to invent one mid-shot — it will drift. We hit exactly this: one shot opened on an empty ramp, and the fix was moving the camera in the 3D scene, not prompting harder.
- One readable camera idea per shot. Overly complex or brutal moves can break the restyling. Concrete action, clear angles.
- Keep the hero subjects visible in every shot. Cross-shot consistency comes from the model seeing the same elements again and again.
- Physical motion. Constant speeds, true parabolas for jumps. Fake eased arcs read wrong once photoreal.
If a shot doesn't respect these rules, you can also simply cut it differently or drop it later — but it's much cheaper to think about it at blocking time.
Phase 1 — One prompt for the whole 3D scene
Nobody modeled, animated or placed a single camera by hand. The whole scene was built by Claude (Fable, in ultra-thinking mode) connected to Blender through the Blender MCP — that connection is what lets the model actually control Blender rather than just talk about it.
Here is the Phase-1 prompt, in full. It's long on purpose: the more constraints you encode here, the fewer surprises downstream. (The train/car story is an example — subjects and setting are fully swappable.)
ultrathink. You are connected to a running Blender instance through the Blender
MCP — use it to build, animate, verify and render a complete blocky 3D action
scene. Work autonomously; stop and show me your results at the checkpoints
marked VALIDATION. Do not move past a checkpoint without my explicit OK.

THE FILM (example — story, era and set are swappable):
A lone 1930s pickup truck races a steam freight train through an abandoned
desert town built along a single rail line. Mid-film, the truck hits a huge
packed-earth ramp, JUMPS OVER the moving train, lands on the far side and
escapes. Pure action, no characters visible. ~17 seconds, 24 fps, 2.39:1
(1920x804), 6-8 shots.

SCENE CONSTRUCTION:
- Blockout style: simple beveled boxes only (bevel ~0.03), per-object flat grey
  values to separate elements by tone (vehicles lighter, set darker). No
  textures, no characters, no small clutter that could be misread by an AI
  restyler later.
- Geography: a straight rail line with a parallel dirt road through a corridor
  of large building blocks; telegraph poles at regular intervals; distant
  canyon walls closing the horizon.
- The set must be carved so cameras never sit inside geometry, with clear
  sight-lines along both the road and the track.

ANIMATION:
- The train moves at a constant physical speed the entire film (e.g. 20 m/s on
  +Y). Never retime the train to fix a shot — retime cameras or the truck.
- The truck races parallel to the train, veers onto the ramp, and its jump is
  a TRUE PARABOLA: compute launch/apex/landing from the frame schedule and
  sample z every 2 frames — no hand-eased arcs. Add landing suspension bounce
  and a small fishtail on recovery.
- Add subtle speed noise to the truck (f-curve noise modifiers) so it never
  looks rail-mounted.

CAMERAS (the star of the film):
- One camera per shot, cut together with timeline markers binding each camera
  at its start frame. All easing lives in the cameras, not the subjects.
- Every camera gets light handheld tremble: per-channel f-curve noise with a
  unique phase per channel, restricted to its shot's frame range.
- Shot list to adapt: side tracking opener, low rear chase, frontal duel (the
  truck charging at the lens, the train alongside), static ramp profile as
  the duo arrives, a follow-cam that launches WITH the truck over the train,
  a low frontal under the flying truck, and a landing/escape shot.
- DESIGN-FOR-AI RULES (hard constraints, will be checked):
  * The FIRST frame of every shot clearly shows every key element of that
    shot (truck AND train AND any set piece like the ramp).
  * Both hero subjects visible in every shot.
  * One readable camera idea per shot; no whip pans, no compound moves.
  * When a camera tracks a moving subject, key camera and subject on the SAME
    frames with LINEAR interpolation — mismatched easing causes collisions.

VERIFICATION (engineer first, director second):
- Write and run a sightline guard: every few frames, ray-cast from the active
  camera to each hero subject; report any occlusion.
- Write and run a clearance guard: 6-direction short ray-casts from each
  active camera; report anything closer than 0.5 m.
- Ray guards can't judge framing: render still checks at every cut point and
  at each shot's midpoint, and inspect them yourself before showing me.
- Encode the film and scan it for frame-to-frame pops (ffmpeg scene-change
  scores): only the cuts should spike.

VALIDATION: show me the check frames per shot and the encoded blocky film.
Iterate with me until the edit feels right.

DELIVERABLES (once validated):
- The final .blend, the full JPEG/PNG sequence at 24 fps, the encoded film,
  one clip per shot (frame counts must satisfy 8k+1: 17, 33, 81, 97...), and
  each shot's FIRST frame exported as PNG. Use -nostdin in every scripted
  ffmpeg call inside loops.
The result of this phase is deliberately ugly and that's the point: a flat, unambiguous "clay" film — pure motion information.
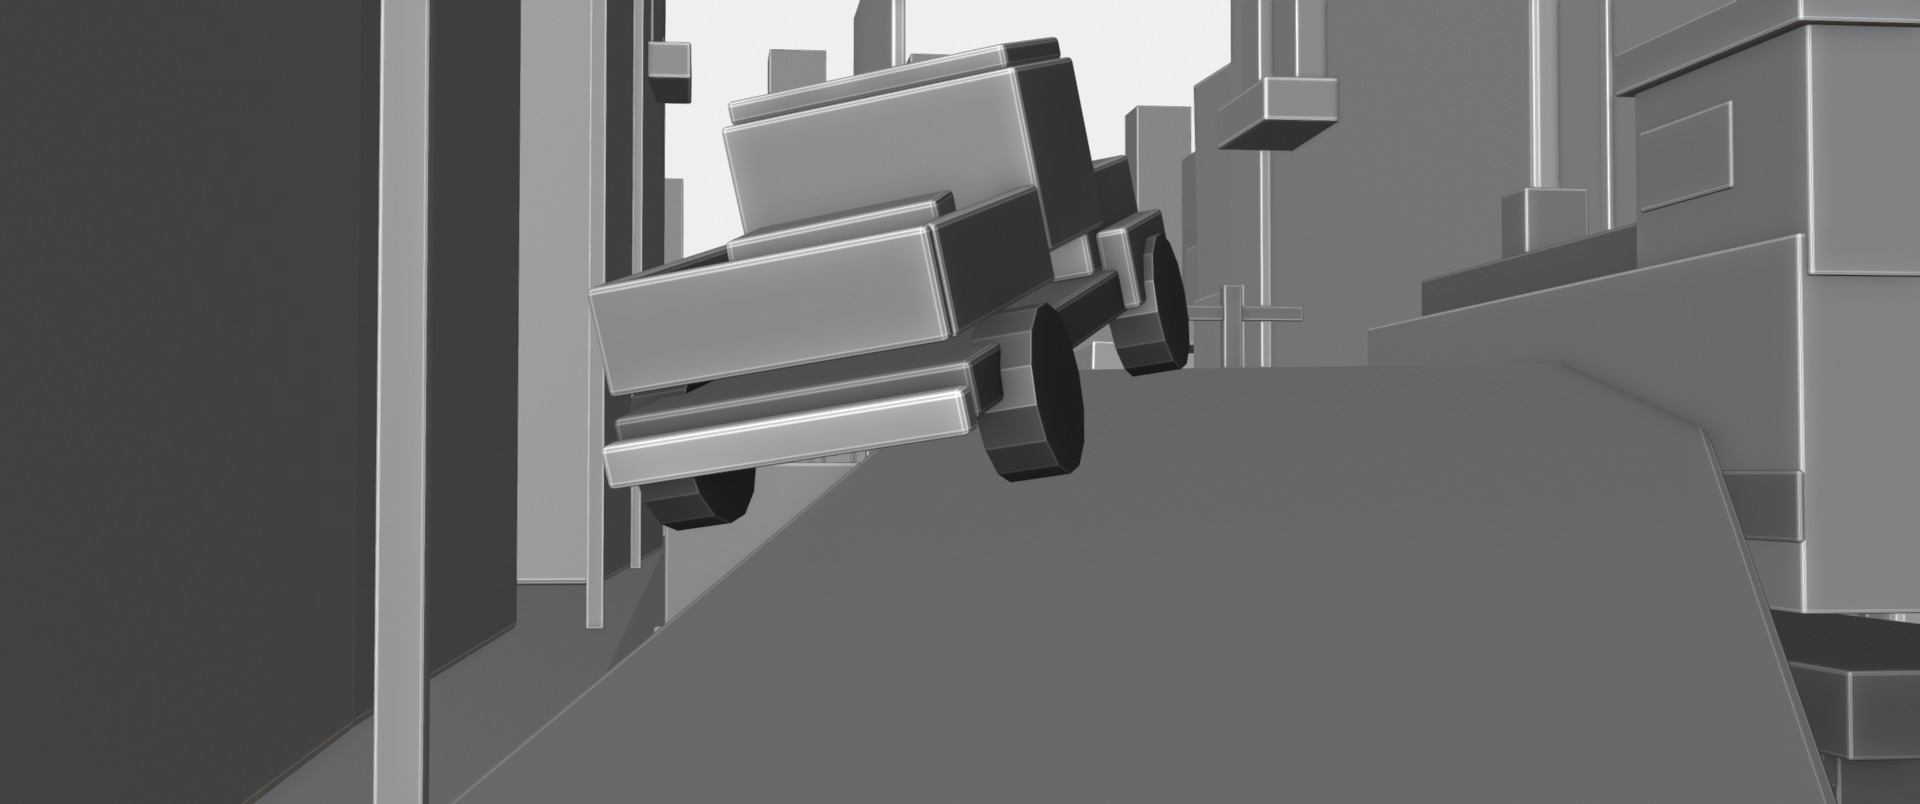
The real Blender session — the whole scene built and animated through the Blender MCP, cameras bound to timeline markers.The clay film — deliberately ugly, pure motion information.
Phase 2 — One prompt for all the images
Validation gate: only start this phase once the blocky film is exactly the film you want.
Two sub-steps live in this phase, and the order matters: references first, keyframes second.
Why references first? Because consistency across 30+ generated images doesn't come from luck — it comes from (a) a canonical style block reused verbatim in every prompt, and (b) the same validated reference images injected into every keyframe generation.
ultrathink. You have the blocky film, its per-shot clips, and each shot's
first frame. Now produce the visual identity and one photoreal keyframe per
shot, using image models on fal. Stop at each VALIDATION.

STYLE BLOCK:
Write ONE canonical style paragraph (era, place, light, film stock, palette
— e.g. "1930s American Southwest desert, abandoned earthen adobe town in a
sun-baked canyon, late-afternoon golden sun, dust haze, 35mm anamorphic
period film, warm Kodak color, fine grain"). Reuse it VERBATIM in every
image prompt of the project. Never paraphrase it.

HERO REFERENCES:
- Generate ~10 candidates each for: the car, the train, the environment
  (text-to-image; nano-banana-pro works well). Same style block everywhere.
- Build me a simple local selection page (numbered grid).
- VALIDATION: wait for my picks. Fix small defects on winners with an edit
  call (remove accidental text, etc.) instead of re-rolling.
- Crop the three validated references to the film's EXACT aspect ratio.
  This is not cosmetic: the edit model matches the MAJORITY aspect of its
  inputs — widescreen refs + one clay frame = recomposed 16:9 output.

KEYFRAMES (one per shot — the critical step):
- One image-edit call per shot (nano-banana-pro/edit; gpt-image-2 or
  flux-2-klein-9b are alternatives): image 1 = the clay first frame,
  images 2-4 = the three validated references.
- Prompt structure (write these yourself, be surgical):
  * "IMAGE 1 is the ONLY source of truth for geometry and composition.
    Reproduce it EXACTLY - same camera, same framing, every object at the
    same position, size, silhouette. Repaint surfaces only. Do not reframe,
    recenter or zoom."
  * "IMAGES 2-4 are STYLE ONLY - ignore their composition entirely."
  * A numeric SPATIAL SURVEY of image 1: each element's extent as % of frame
    width/height, including what is cropped by the frame edges. Mandatory
    for extreme close-ups, which edit models otherwise "improve" by zooming
    out.
  * The canonical style block, verbatim.
  * A self-check clause: "overlaid at 50% on image 1, no double edges."
- Generate 20-40 candidates per shot, in batches of 4. Expect some API
  refusals on tight close-ups; retry those batches.
- Score every candidate automatically: edge-detect both candidate and clay
  (ffmpeg edgedetect), compute PSNR, rank. ~17+ is good.
- Build me a review page: per candidate, the image NEXT TO the clay frame,
  and a 50% blend overlay UNDERNEATH, with its score.
- VALIDATION: wait for my picks per shot. Where I reject everything, ask
  what's wrong, sharpen the survey language, and regenerate that shot.

Which image model to use on fal
This phase is model-agnostic by design — any strong multi-image edit model on fal can produce the keyframes. Four options, all tested on this pipeline:
- Nano Banana Pro — edit — the default for this film. Best instruction-following of the group: it takes the "image 1 is the only source of truth" contract seriously, and its multi-image conditioning (clay frame + three references) is exactly the shape of this job. It is also the surgical-fix tool — replace a deformed car on a winning keyframe while keeping every other pixel untouched.
- Seedream 5.0 Pro — edit — the strongest raw photoreal push we measured: it takes blocky geometry the furthest toward "period photograph". Two practical notes: always request an explicit
image_size(the auto presets can recompose the frame), and describe the perspective in plain sentences — it follows natural language better than numeric coordinates. - GPT Image 2 — edit — excellent world knowledge and scene logic (period-correct props, materials, signage); the right pick when a keyframe needs semantic reasoning more than strict geometry.
- FLUX.2 [klein] 9B — edit — open weights and fast: the volume option when you generate 20–40 candidates per shot, with solid geometry preservation.
Whichever model you pick: same references, same canonical style block, same overlay QC. The pipeline doesn't care which brush you use — it cares that you verify.
How the keyframe prompts are actually written
Every keyframe prompt in this project is assembled from the same five ingredients, in this order:
- The contract — one blunt opening line: "Image 1 is the ONLY source of truth for geometry and composition. Repaint surfaces only. Do not reframe, recenter or zoom."
- The role of each input — "Images 2–4 are STYLE ONLY — ignore their composition entirely." Edit models blend inputs by default; you have to forbid it explicitly.
- A spatial survey of image 1 — a few sentences that pin every element to the frame: what is huge and cropped by which edge, what sits at the center, which direction everything travels, and what must NOT appear ("the train travels away from the camera — no locomotive front, no headlamp, nothing faces the lens"). For extreme close-ups this part is mandatory: it is the only thing that stops the model from politely zooming out. Plain language beats coordinates: "the pickup is seen from directly behind, slightly left of center, racing away toward the vanishing point."
- The canonical style block, verbatim — the same era/place/light/film-stock paragraph pasted unchanged into every prompt of the project. Cross-shot consistency lives here, nowhere else.
- A self-check clause — "overlaid at 50% on image 1, no double edges on road, rails, buildings or vehicles." It measurably improves adherence, and it mirrors exactly how the result will be judged afterwards.
When a shot keeps failing, the fix is almost never "prompt harder". It is a sharper survey (ingredient 3), or references cropped to the film's exact aspect ratio, or — for a first frame that doesn't show every key element — moving the camera in Blender.
What we learned the hard way here, so you don't have to:
- Edit models recompose. Their instinct is to make a nicer image — zoom out, recenter, prettify. The geometry-lock language and the survey percentages are what stop them. This took several failed rounds to converge; the overlay tool is what made each failure visible immediately.
- The aspect-ratio trap cost us a full generation round: 16:9 references quietly overrode the 2.39:1 clay frame. Crop your refs.
- Volume is a feature. With 20-40 candidates per shot, the perfect draw exists; your job becomes selection, not hoping.
- Verify with overlays, not vibes. If edges double in the 50% blend, the perspective drifted — and the video model will faithfully animate that drift later.
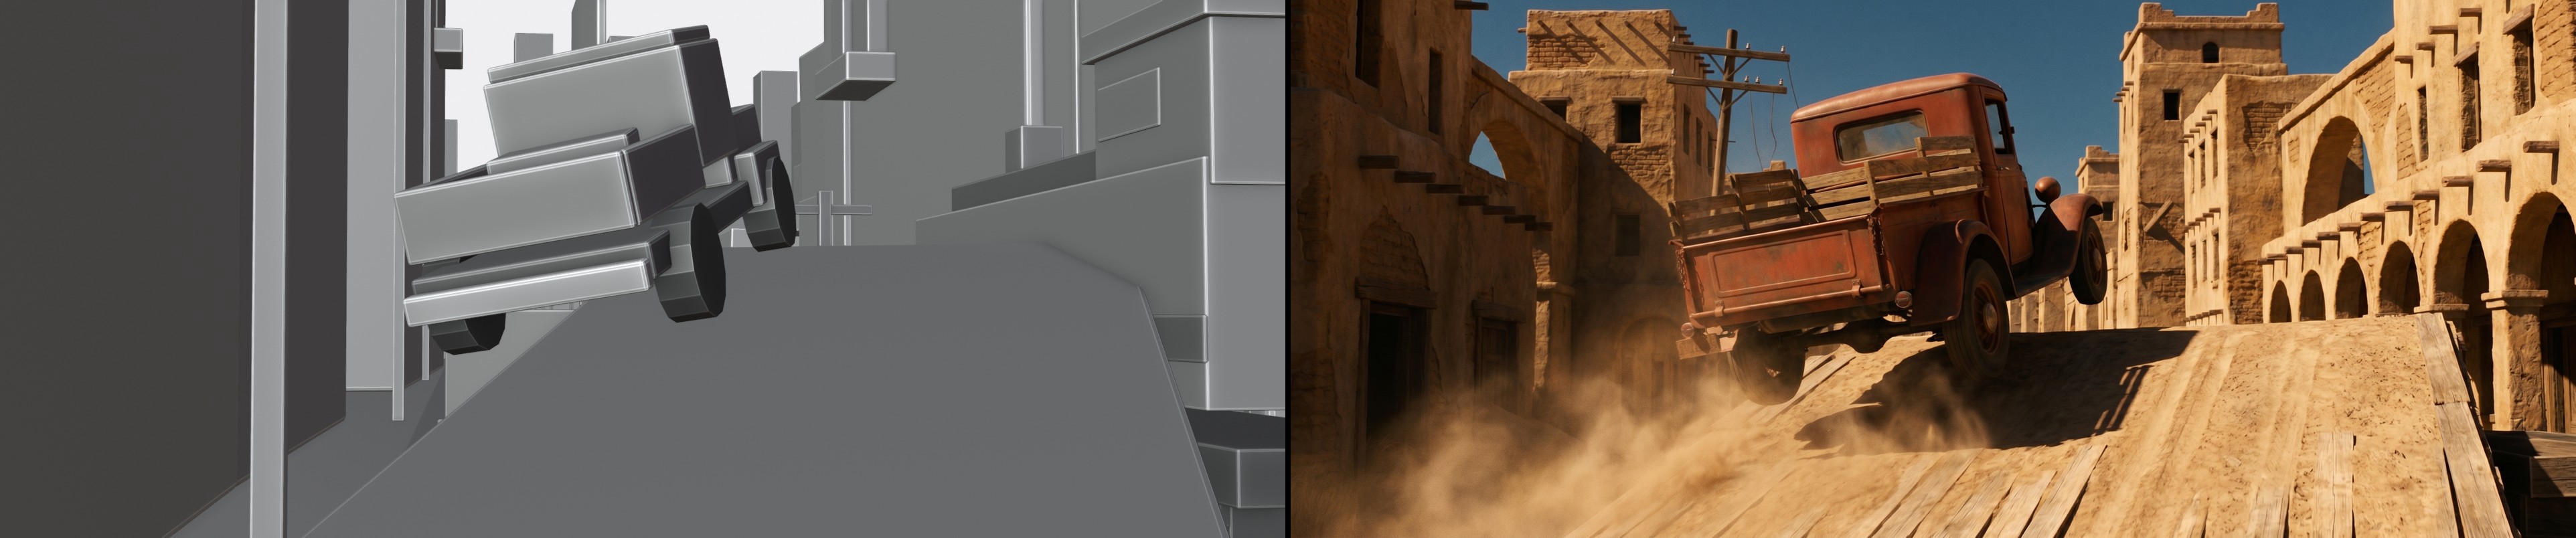
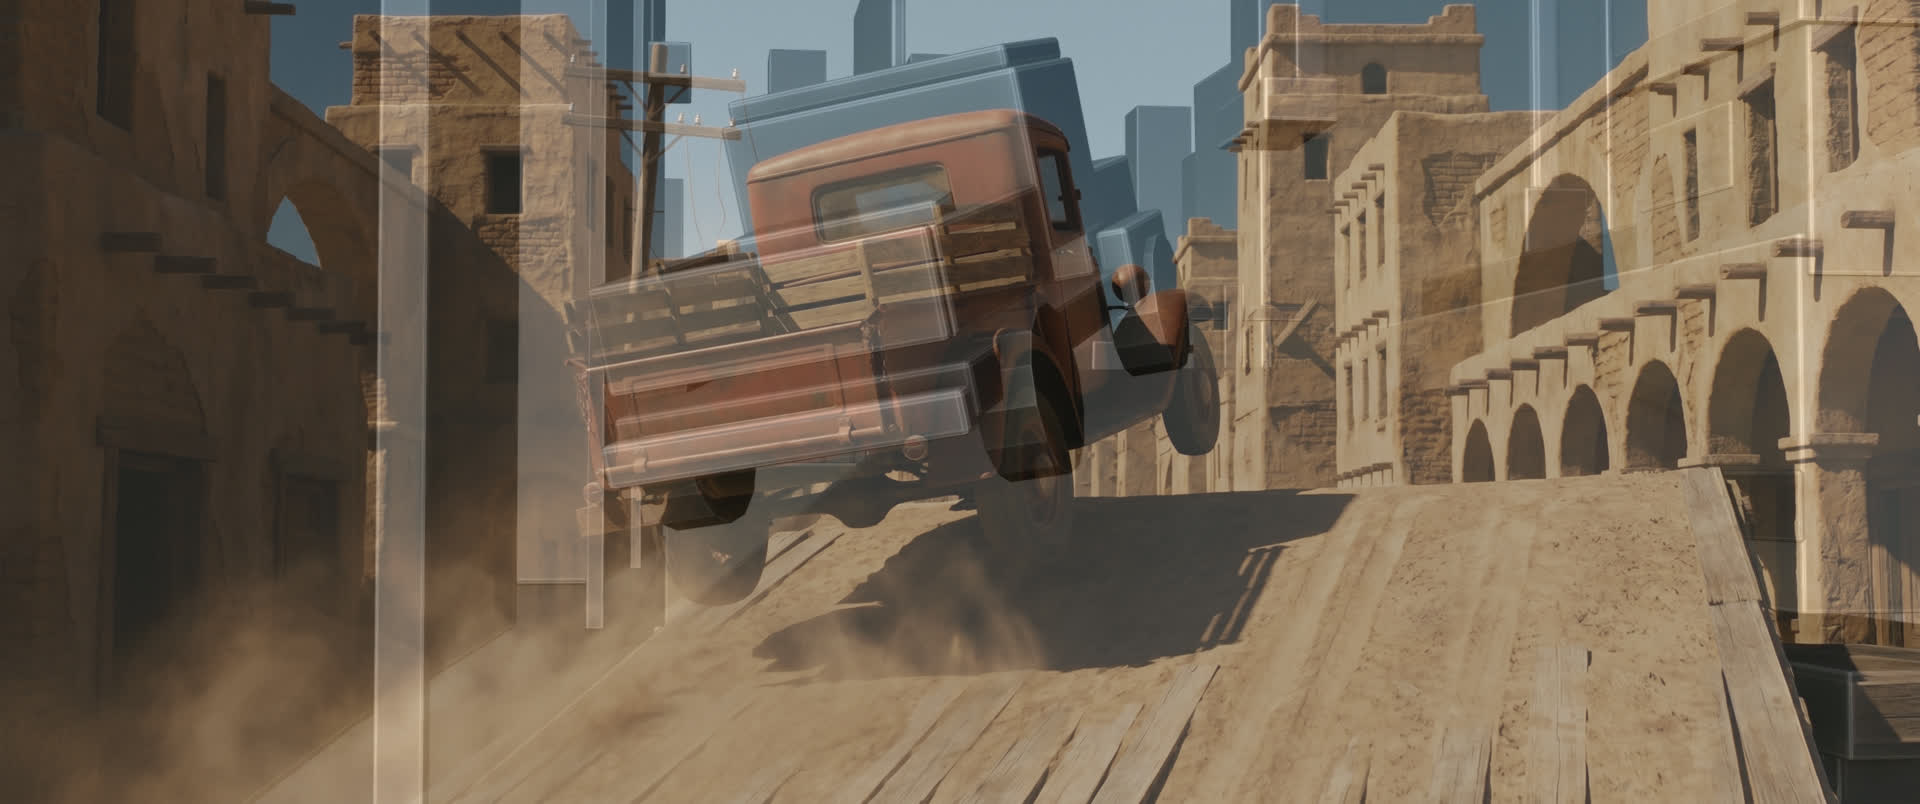
The keyframe review tool — every candidate next to its clay frame, 50% blend underneath, alignment score.
We don't write these prompts by hand. We ask Fable to write them, look at the results, and give direction ("the car must be dead frontal", "don't zoom out"). Iteration is the job.
Phase 3 — One prompt for all the videos
Validation gate: only start once every keyframe overlays its clay frame cleanly.
ultrathink. You have per-shot clay clips and one validated keyframe per shot.
Generate the final footage with fal-ai/ltx-2.3-quality/render-to-real.

PER JOB:
- video_url = the shot's clay clip (motion), image_url = the validated
  keyframe (look), num_frames matching the clip (8k+1), 24 fps.
- Settings: 720p, intensity strong-v2, detail refine ON (strength 0.9),
  audio ON.
- Write a DESCRIPTIVE ACTION PROMPT per shot: what moves, in which
  direction, what the camera does, plus sound cues (engine roar, steam
  pistons, landing impact). Generic mood prompts waste this model - it
  needs the action.

EXECUTION:
- Render 3-4 seeds per keyframe (selection is cheap, quality is free).
- Rolling window of ~10 concurrent jobs: when one finishes, download it
  immediately and launch the next. Persist job state to disk so the whole
  run is resumable if interrupted.
- For every video, build a synchronized vertical comparison: generated on
  top, clay underneath.

VALIDATION: I pick one video per shot; you cut the picks together in order
and deliver the final film.
Why this model: render-to-real is specialized in reproducing the exact motion of the render you feed it — which is precisely why all the verification above matters. Give it a keyframe with a perspective error, and it will animate that error beautifully. Give it a clean one and it locks on. And again: this step is open — the 3DREAL LoRA we trained for LTX 2.3 is on Hugging Face (Light and Strong variants), and the same pipeline runs through the fal endpoint used here.
How 3DREAL works under the hood
A quick technical detour, since this is the part we open-sourced.
The base model is LTX 2.3, a video diffusion transformer. 3DREAL is an in-context LoRA on top of it: instead of conditioning on text alone, the model receives the CG clip itself as a dense conditioning stream (motion, layout, camera) plus one keyframe as the appearance anchor. The LoRA was trained on paired sequences — 3D/CG renders aligned with photoreal footage of the same composition — so what it learns is precisely the mapping we need: repaint the surfaces, keep the geometry. The trigger word 3DREAL activates it.
The three adapters trade fidelity against transformation strength:
- Light — gentle push, maximum structural faithfulness, fewest hallucinations. Start here.
- Strong — aggressive photoreal push for complex scenes.
- Strong v2 (new) — retrained with multi-shot sequences and joint audio: it stays coherent across cuts inside one clip, generates synced audio, handles talking characters (faces, lip motion) far better, and is sharper overall.
Endpoint mechanics worth knowing (fal-ai/ltx-2.3-quality/render-to-real):
video_urldrives motion,image_urldrives look — the split that makes the whole pipeline controllable.num_framesmust satisfy 8k+1 (17, 33, 41, 81, 97…): the temporal autoencoder compresses time by a factor of 8, plus one anchor frame. Cut your clay clips to these lengths from the start.- Because the conditioning is dense, the endpoint runs distilled with low guidance and few steps — video-to-video here is faster than text-to-video, not slower.
intensityselects the adapter preset (strong-v2recommended);enable_detail_refineadds a 2× spatial-upscale + detailer pass (we run it at strength 0.9) — that is how 720p jobs come back looking like 2K.generate_audioasks Strong v2 for a synced soundtrack along with the pixels.
Straight out of render-to-real — the gorge crossing, clay below.Straight out of render-to-real — the frontal duel, clay below.Four seeds of the same shot — with volume, your job becomes selection.The video selection tool — one pick per shot out of 132 takes.The hosted endpoint on fal — the same pipeline, no setup.
On this project the full run was 33 validated keyframes × 4 seeds = 132 videos, generated with zero failed jobs, each downloaded the moment it finished.
Phase 4 — Edit, sound, music, grade
The last phase is the most classic one. One video is picked per shot, and the film is cut together in order — any editor works here (After Effects, Resolve, whatever you like), and honestly Fable can compose the edit itself with ffmpeg if you ask; that's how this one was assembled.
Then the audio pass:
- Sound effects: Mirelo (video-to-audio, endpoint
mirelo-ai/sfx-v1.5/video-to-audio) generates sounds synced to the final footage — no text prompt needed, the video itself is the prompt. Purpose-built for AI-generated video, which is exactly what our footage is. - Music: a period-flavored track created with Suno, laid under the full edit.
- Grade: a light color pass to unify the shots — with everything generated from one style block and the same references, very little was needed.
That's the film: designed in grey boxes, finished with sound, music and grade.
The finished opening — first three shots, Mirelo SFX and score, 3D below.
Honest recap
What was actually done, end to end: the full blocky scene (built, animated and verified by Fable through the Blender MCP — including its own ray-cast guards), the clay film, 3 validated hero references, 200+ scored keyframe candidates reviewed with overlays, 33 validated keyframes, 132 render-to-real videos, the final per-shot selection and edit, the Mirelo SFX pass, the Suno score, and a light final grade.
Failures worth knowing about: edit models recomposing close-ups (fixed with spatial surveys), the 16:9 aspect trap (fixed by cropping refs), a shot whose first frame didn't show the car (fixed in Blender, not with prompts), occasional API refusals on tight close-up batches (retry), and a classic ffmpeg-in-a-loop bug that silently corrupted three shots' first frames (-nostdin, always). None of these were caught by luck — every one was caught by a verification tool the pipeline builds for itself.
The honest summary: this is not magic, it's a method. Three prompts, clear checkpoints, tooling that makes errors visible, and a human who picks winners. The control is real — and that's the part no current video model gives you on its own.